I Moved My Clients Off WordPress. Here Is How to Do It for Free.

It starts with a call at 9am. The website is down. Actually, it is worse. The site is up, but it is serving malware, and a browser security warning is blocking every visitor. The hosting company suspended the account automatically. The client does not know the WordPress admin password, because the original web agency set it up two years ago and never handed over the credentials.
This is not a horror story. This is an ordinary Tuesday.
A client once put the problem to me in plain terms: the site keeps getting hacked, and it is very slow. That is not a failing of the business. It is a failing of WordPress, and almost every business running on WordPress hits it eventually.
WordPress runs 43% of all websites on the internet. It is also responsible for the overwhelming majority of hacked CMS installations. The reason is structural. WordPress needs a live server, a running database, and a stack of plugins. Any one of those can introduce a vulnerability. An attacker does not need to break your password. They break one outdated plugin, and the rest follows.
I have watched this happen to a building materials directory, a property consultancy, and a professional services firm. In every case the business owner was already paying for hosting and a maintenance retainer, and still got hacked.
A few migrations later, I now run a different stack. It costs less than the WordPress hosting alone. It cannot be hacked the same way. A non-technical staff member can manage the whole thing in plain English.
This article is the complete playbook. Every account to create, every command to run, and every habit worth keeping. If you have a WordPress site you would rather not keep patching, you can follow it end to end.
The three-component stack
The replacement is not one product. It is three tools that each do one job.
Astro compiles your entire website into plain files at build time. HTML, CSS, and JavaScript, ready to serve. There is no server running when a visitor loads a page. No database being queried. No plugin executing anything. Nothing runs, so nothing can be exploited. The security model is architectural, not a patch that expires.
Cloudflare serves those files from data centres in over 300 cities. The free tier covers static hosting with no bandwidth cap. SSL certificates are automatic. DDoS protection is included. Hosting cost: zero.
Claude Code Desktop manages every edit. A staff member opens the project folder in the app, types what they want in plain English, and Claude makes the change. "Update the phone number in the footer" is the whole instruction. No code knowledge, no developer, no support ticket.
The fourth element is GitHub, the version-control layer. Every change is saved as a commit, so any mistake is undoable in one command. Every push to GitHub tells Cloudflare to rebuild and republish the site automatically, within two minutes.
Here is the mental shift. In WordPress, to change something you log into a dashboard and click around. In this model there is no dashboard. The website is a folder of files. You describe the change to Claude Code, it edits the files, GitHub saves the change, and Cloudflare publishes it. The way you edit the site is completely separate from the way visitors see it. There is no editing tool exposed to the public internet. That is why there is nothing to hack.
What it costs
| Item | Monthly cost |
|---|---|
| Cloudflare hosting | Free |
| GitHub | Free |
| Claude Code Desktop (Pro plan) | USD 20 (~RM 94) |
| Image generation (Gemini) | Near zero (~RM 0.18 per image) |
| Domain renewal | No change |
| Total | ~RM 94/month |
Compare that to a typical WordPress setup: RM 50 to 200 a month for shared hosting, plus a security plugin subscription, plus developer fees when something breaks. The new stack pays for itself immediately.
One subscription to Claude Code covers the person doing the editing and every site they manage. As you add sites, the cost per site trends toward zero.
What you need before you start
Create these accounts first. Each takes about two minutes, and all are free except Anthropic.
- Cloudflare (dash.cloudflare.com). Hosts the site worldwide and manages your domain's DNS and SSL.
- GitHub (github.com). Stores the site files and acts as the undo button.
- Anthropic (claude.ai). Powers Claude Code Desktop. This is the only paid piece, at USD 20 a month on the Pro plan. The Max plan is not needed.
- Google account for Google Search Console, to submit your sitemap. Most people already have one.
- Google AI Studio (aistudio.google.com), only if you want to generate images. Free to start.
Before migration day, write down three things: your live WordPress URL, your domain registrar login (or the name of whoever in your company manages it), and the email address where website enquiries should land.
One rule before anything else. You are creating accounts and keys that control your website and your domain. Treat them like a bank PIN. Turn on two-factor authentication on Cloudflare, GitHub, and Anthropic. Use a password manager. Never share an API key in chat, email, or WhatsApp. The person who controls the domain registrar login controls the domain, so limit that access to one or two named people.
One-time setup: install the tools
This is done once per computer. Budget about 30 minutes the first time. Each tool has a one-line check so you know it worked. Commands are shown for a terminal; the same tools exist for Windows, Mac, and Linux.
Node.js. The engine that runs Astro and the command-line tools. Download the LTS version from nodejs.org, install it, then check:
node -v
npm -v
Git. The version-control system GitHub is built on. Install from git-scm.com, accept the defaults, then check:
git --version
GitHub CLI. Create a free account at github.com first, then install the command-line tool:
# Windows
winget install --id GitHub.cli

# Mac: install Homebrew first if you do not have it (go to brew.sh), then:
brew install gh
Log in once. This opens your browser to authorise the computer:
gh auth login
Choose GitHub.com, then HTTPS, then "Login with a web browser". Confirm with gh auth status.
Cloudflare and Wrangler. Sign up free at Cloudflare and turn on two-factor authentication while you are there. You do not install Wrangler globally; the Astro project includes it. Log your computer in once:
npx wrangler login
A browser window asks you to authorise Wrangler. Click Allow, then confirm with npx wrangler whoami.
Claude Code Desktop. This is the AI assistant that does the actual editing. There is no command-line install.
- Go to claude.ai/code and download the installer for your system.
- Run it and open Claude Code Desktop.
- Sign in with your Claude account on first launch.
- To work on a site, click Open Folder and choose the project folder. The AI chat and a built-in terminal open side by side.
After this, a staff member never reinstalls anything. They open the app, choose the project folder, and start working.
my-website-agent. This is the part that makes the whole workflow repeatable. I packaged the entire playbook into a free, open-source agent: a Claude Code skill plus a small wppull CLI that pulls a WordPress site's content out through the REST API. Install it once:
git clone https://github.com/tehkimguan/my-website-agent
cd my-website-agent
./setup
That installs the wppull command and copies the kg-website-agent skill into ~/.claude/skills/. After a restart, Claude Code auto-triggers it whenever you mention migrating a site, cloning a design, or deploying to Cloudflare. The same repo carries a GEMINI.md and AGENTS.md if you use Gemini Code Assist or Copilot instead.
The six-phase migration
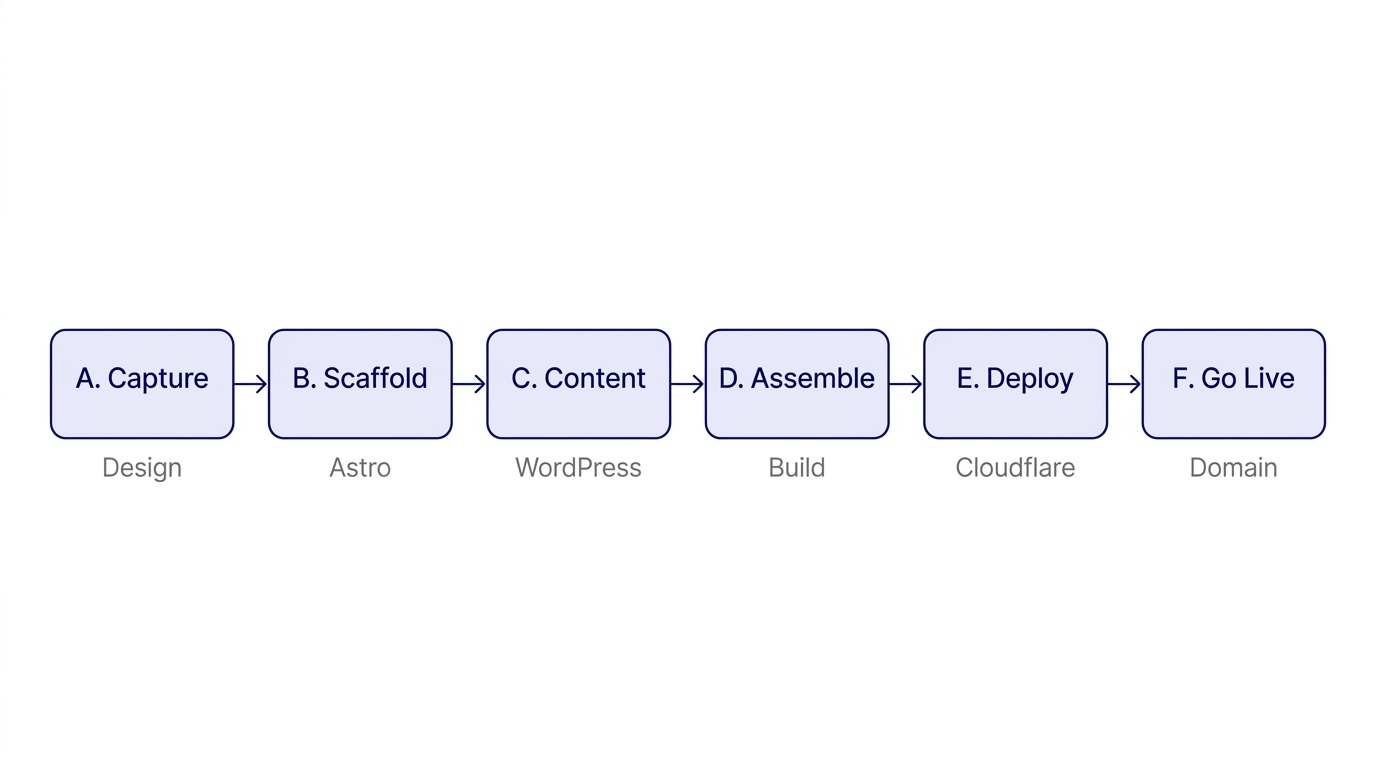
A migration has two tracks that meet at the end. The design (the look of the old site: colours, fonts, header, footer, layout) and the content (every post, page, and image). You capture the design, bring the content across, then have Claude Code fit them together and ship to Cloudflare. A first migration of a small site takes one afternoon. A team that has done it once can repeat it in two hours.
Phase A. Capture the old design
With my-website-agent installed, the skill captures the old design using the AI's built-in computer-use. There is no separate scraper to install. You just point it at the live site:
"Capture the design of yourdomain.com and its main pages. Screenshot each section at desktop and mobile, read the real colours and fonts from the DOM, download the logo and key images into public/images, and write a component spec plus a token sheet to capture/."
The agent opens each page like a careful surveyor: it takes screenshots at desktop and mobile sizes, reads the exact colours and fonts from the rendered page, downloads the images and logos, and writes a specification for each section (header, hero, cards, footer).
When it finishes you have screenshots, the design tokens (the precise colours, fonts, and spacing), all the downloaded images, and written specs for each component. These are framework-neutral. In Phase D, Claude Code reads them and rebuilds each piece. You are reusing the surveyor's report, not the surveyor's scaffolding. Only capture sites you own or are authorised to rebuild.
Phase B. Build the new project
The easiest path is to let Claude Code scaffold the whole project. Open a fresh folder, open it in Claude Code Desktop, and say:
"Set this up as an Astro static site for Cloudflare. Add the Cloudflare adapter, Tailwind, sitemap, and MDX. Create a blog content collection with title, description, publish date, and tags. Use the design tokens and images in the capture/ folder for the colours, fonts, and logo."
If you would rather run it by hand:
npm create astro@latest my-site
cd my-site
npx astro add cloudflare      # lets the site run on Cloudflare
npx astro add tailwind        # styling
npx astro add sitemap mdx     # search-engine sitemap + MDX content
Content lives as text files. Each blog post is one file with a small header (called frontmatter) and the article below it in plain Markdown:
---
title: "Welcome to our new site"
description: "We rebuilt our website to be faster and safer."
publishedAt: 2026-06-01
tags: ["news"]
draft: false
---

This is the article body, written in plain text.

## A heading

A paragraph. **Bold** and *italic* work as you expect.
A draft: true post is never published, so staff can write freely and nothing appears on the live site until the switch is flipped to false. If the site becomes an application later, with logins or dashboards, tell Claude Code to set it up as Next.js instead. Everything from here on is identical.
Phase C. Bring the content across
WordPress quietly exposes all of its content as clean data. Open these in a browser to confirm they work, swapping in your own domain:
https://yourdomain.com/wp-json/wp/v2/pages?per_page=100&page=1
https://yourdomain.com/wp-json/wp/v2/posts?per_page=100&page=1
https://yourdomain.com/wp-json/wp/v2/media?per_page=100&page=1
You do not need to read the data. The wppull CLI from my-website-agent pulls all of it out and writes one Markdown file per post and page, plus a manifest of every image:
wppull --json pull yourdomain.com --out src/content/blog --type both
wppull media yourdomain.com --download public/images
Then ask the skill to finish the job: "convert the HTML bodies in src/content/blog to clean Markdown, fix the image links to point at /images/, and skip nothing." The CLI leaves the body as the original rendered HTML on purpose, because semantic conversion to clean Markdown is the AI's job, not a brittle script's.
If the REST API is switched off, use WordPress's built-in export instead (Tools, then Export, then All content), drop the XML file into the project, and ask Claude Code to convert it.
One step protects your Google rankings. If a page used to live at /services/ and you move it to /solutions/, the old address should keep working. Create a redirects file at public/_redirects:
# old path      new path       code
/services/      /solutions     301
/our-team/      /about         301
/blog/*         /news/:splat   301
Cloudflare reads this automatically and forwards old links to the new ones. Ask Claude Code to "generate a _redirects file mapping every old WordPress URL to its new path" and it builds the full list. Do this before go-live, not after.
Phase D. Assemble
Now the two tracks meet. Claude Code fits the captured design to the imported content. Work through the site one piece at a time:
"Using the header, footer, and colours from the capture/ specs, build the site layout in Astro. Then build the blog index page that lists all posts newest first, and the single-post page that shows one article. Match the old site's look. Keep it responsive on mobile."
Preview on your own machine at any time:
npm run dev
Open the address it prints (usually http://localhost:4321). Nobody else can see this. Do not ask for the whole site in one go. Ask for the header, check it. Ask for the blog list, check it. Small, checkable steps give far better results.
Phase E. Deploy to Cloudflare
First put the project on GitHub. From the built-in terminal in Claude Code Desktop:
git init
git add .
git commit -m "Initial migrated site"
gh repo create my-site --private --source=. --remote=origin --push
The git add . stages all project files. Your .env file, which holds API keys, is excluded automatically by the .gitignore that Astro generates. If you want to be sure, ask Claude Code "is any secret file about to be committed?" before you push.
Then pick how Cloudflare hosts it. For a normal website (pages, blog, brochure, directory) use Cloudflare Pages: in the dashboard go to Workers and Pages, Create, Pages, Connect to Git, pick your repo, set the framework preset to Astro, build command npm run build, output directory dist, and Save and Deploy. From then on, every push to GitHub rebuilds and republishes the site automatically. That is the whole pipeline.
For a site that also needs live features like a working contact form, use Cloudflare Workers. It needs a small config file, wrangler.jsonc, then a deploy command:
npm run build
npx wrangler deploy
If a form needs a secret such as an email-sending key, store it in Cloudflare without ever putting it in the code:
npx wrangler secret put EMAIL_API_KEY
One gotcha worth knowing: on Workers, a server-side form route must read its secret from the runtime, written as locals.runtime.env.EMAIL_API_KEY, not the build-time import.meta.env. Get this wrong and the form fails silently. Claude Code knows the pattern; mention this line if a form misbehaves.
Phase F. Go live
You now have the new site running on a free .pages.dev or .workers.dev address. The final step is pointing your real domain at it. Add a custom domain in the Cloudflare dashboard, smoke-test every page on the real domain, submit the sitemap to Google, turn on free Web Analytics with one toggle, and keep the old WordPress switched off but not deleted for two weeks in case anything was missed.
Pointing your domain at Cloudflare
This is the step that trips people up, so it gets its own section. To use Cloudflare you point your domain's nameservers at it. The process is the same at every registrar.
In the Cloudflare dashboard, click Add a site, enter your domain, and choose the Free plan. Cloudflare then scans your existing DNS records and imports them. Review that list carefully before you continue.
Here is the part that silently breaks businesses. Check that your MX records, the records that route email to your domain, appear in the imported list. If they are missing and you complete the migration, inbound email to your domain stops the moment you go live. No bounce message. The messages simply disappear. Look for rows with the type MX. If you see them, proceed. If the list has only A and CNAME rows and you use email at your domain, stop and add the MX records by hand before continuing.
Cloudflare then gives you two nameserver addresses. Copy them, log in to your registrar's control panel, find the Nameservers setting for your domain, and replace the existing entries with Cloudflare's two. If you cannot access the registrar yourself, email their support with the domain name and the two nameservers and ask them to make the change.
Propagation takes between 30 minutes and 48 hours. To track it without guessing, go to whatsmydns.net, search your domain, and choose record type NS. When Cloudflare's nameservers appear across most of the world map, propagation is done, and the Cloudflare dashboard shows the domain as Active. Only then connect the domain to your project in Workers and Pages settings. SSL issues automatically and for free.
Getting found on Google
Astro publishes a sitemap automatically at /sitemap-index.xml on every deploy. Telling Google about it speeds up indexing and protects the rankings you are carrying over.
Open Google Search Console, add your site as a Domain property, and verify by DNS. Because you are already on Cloudflare, this is quick: Google shows a TXT record, you add it in Cloudflare's DNS settings, and click Verify. Then open Sitemaps, type sitemap-index.xml, and Submit. Finally, use URL Inspection to request indexing for your homepage and a handful of important pages.
The redirects from Phase C are what carry your existing rankings across, so submit the sitemap the same day you switch the domain. Google re-crawls quickly and sees the redirects. Optionally repeat the sitemap submission at Bing Webmaster Tools, which feeds Bing and some AI assistants.
Daily operations: running the site
This is the part the team uses every day, and there is no dashboard to learn. The entire skill is: open Claude Code Desktop, choose the project folder, and describe what you want.
These are real instructions a staff member gives Claude Code:
"Write a new blog post titled 'Five tips for choosing roofing materials'. Here are my rough notes: [paste]. Format it as an MDX file in the blog folder, give it a good description, today's date, and the tag 'guides'. Then show me a preview."
"Change the big headline on the home page to 'Malaysia's Trusted Building Materials Directory'."
"Update the phone number in the footer and the contact page to 03-1234 5678."
"There is a typo on the About page: 'experiance' should be 'experience'. Fix it."
When you are happy with the preview, save the change. The easiest way is to ask Claude Code directly: "commit this with the message 'add roofing tips post' and push." Or run it yourself:
git add .
git commit -m "Add roofing tips blog post"
git push
The .env key file is excluded automatically by .gitignore, so it never travels to GitHub. Cloudflare notices the push and rebuilds within a couple of minutes. That is the entire publishing process.
Because every change is saved in GitHub's history, undoing anything is safe. Ask Claude Code to "undo my last change and push the revert", or open the Cloudflare dashboard, find the previous successful deploy, and click Rollback. The site reverts in seconds. Nothing is ever truly lost.
Generating images
A website needs pictures: a homepage hero, blog covers, and the little preview image that shows when a link is shared on WhatsApp or Facebook. The clone skill brings across the images the old site already had. For anything new, I generate it with Google's image model, nicknamed Nano Banana. Trying it is free. In bulk it costs roughly four US cents (about RM 0.18) per image, so a whole brochure site needs less than one dollar of images.
Get a free key at aistudio.google.com: click Get API key, then Create API key. The key starts with AIza. Treat it like a password and store it only in the project's .env file, never in the code.
There is no extra server or plug-in to install. The kg-website-agent skill calls the Gemini image API directly with the key in your .env, so when you say "make a 16:9 hero for the home page in our brand style, save it to public/images, and use it", the agent writes the short call, generates the image, converts it, and wires it in. A static site does not need an always-on image service; one API key is enough.
# in your project .env (git-ignored, never committed)
GEMINI_API_KEY=AIza...
Keep one consistent style so every image feels like the same brand. A 16:9 image around 1,500 pixels wide is plenty; generating at 4K is slower, costs more, and the visitor never sees the difference. Ask Claude Code to convert images to JPEG or WebP for the web and to write alt text for each.
For a contact form, a static site needs a small service to receive the message. The simplest option is a no-server form service like Web3Forms or Formspree, which email you each submission on a free tier. For full control, a small Cloudflare Worker route sends the email through a service like Resend, with the key stored as a Cloudflare secret. Never commit a key to GitHub. If a key ever lands in a repository, rotate it immediately in the provider's dashboard.
Turning repeated work into reusable skills
Here is the step that turns this from a website your staff can edit into a website your staff can run like a system. Any task you do more than a couple of times should become a skill: a saved instruction sheet that Claude Code follows the same way every time, for anyone who triggers it.
Inside Claude Code, type /skill-creator and describe the operation in plain English:
"Create a skill called publish-post. When I give it a draft, it should check the post has a title, description, date and tags, generate a cover image in our brand style, save it, build the site, and if the build passes, commit with a clear message. It must never push without asking me first."
The skill is saved as a small instruction file, either inside the project at .claude/skills/publish-post/SKILL.md for one site, or in your user folder for every site you run. From then on, any staff member runs it by name: "run publish-post on my latest draft."
A good starter set: publish-post (validate a draft, make its cover, build, commit), site-maintenance (find broken links and confirm a clean build), add-page (add a service or listing page from your standard template), and seo-check (verify title, description, headings, and alt text before publishing). Build each one the first time you hit the task by hand.
Skills remove the reliance on any one person remembering the steps. A new staff member is productive on day one, and the site gets more reliable the longer you run it, because every repeated task is captured instead of re-improvised. I have written before about why self-evolving skills become the real infrastructure for reliable AI operations, and a website team is one of the clearest places to see it pay off.
Why the hacking stops and the speed problem disappears
A hacker needs a door. WordPress has several, and this stack removes all of them from the public side.
| WordPress had | This stack has | Result |
|---|---|---|
A public login at /wp-admin | No login page on the site | Nothing to brute-force |
| A live MySQL database | No database | Nothing to inject |
| PHP running on each visit | Pre-built static files only | No code to exploit |
| Dozens of plugins, each a risk | No plugins | No plugin holes |
| Your own server to patch | Cloudflare's network serves the files | No server of yours to breach |
The editing happens on a staff member's own computer and is saved to a private, two-factor-protected GitHub account. The public only ever receives finished, read-only files. There is, in practical terms, almost nothing left on the public website to hack.
Speed follows the same logic. WordPress built each page on demand, on one server, often slowly. This stack ships finished pages from Cloudflare's data centres in hundreds of cities, so every visitor gets a copy from somewhere close to them, already built. A page in Malaysia loads from a Malaysian or Singaporean edge in a fraction of a second. And because all pages are just files, page number 2,000 is exactly as fast as page number one.
Sites running this today
ttkbuildingmaterials.com. A 2,000-page building materials directory with a working enquiry form. The form routes through a Cloudflare Worker that emails submissions using a sending API. No database, working form, every page just as fast as the last.
businessdataguide.com. A data product site with a blog. It rebuilds in under two minutes on every push.
Both have been running without a security incident since migration. Both cost nothing to host. The proof that matters here is that the same method holds from a small brochure site to one of more than 2,000 pages, with no change to how it is run.
How to start
The accounts to create are Cloudflare, GitHub, and Anthropic. All free except Anthropic at USD 20 a month. The tools to install are Node.js, Git, the GitHub CLI, and the Claude Code Desktop app from claude.ai/code. Then install the agent that runs the whole playbook, my-website-agent, free and open source:
git clone https://github.com/tehkimguan/my-website-agent
cd my-website-agent
./setup
First-time setup takes about 30 minutes, and your first migration takes an afternoon. The second one takes two hours.
If you would rather not run the migration yourself, this exact playbook is the Clone-and-Migrate blueprint inside my AgenticOS productized service: I take an existing slow or expensive site and rebuild it on this stack in 14 days, then hand your team the plain-English operating model so they can run it without me. Either way, the destination is the same. A site that is fast, that cannot be hacked the way WordPress is, and that effectively costs nothing to host.
Part of the Business Process Intelligence series from KG Consultancy.
Strategy and technology are the same decision. Over 15 years in fintech (CTOS, D&B), prop-tech (PropertyGuru DataSense), and digital startups, I have built frameworks that help founders and executives make both moves at once. Based in Kuala Lumpur.
Working on a 0→1 product?
I help founders and operators go from idea to validated product. Let's talk about yours.
Get in touch →